Start your fully customized squad shooter project using Core’s Last Team Standing framework! This lesson follows the same format as the Build Your First Game: Deathmatch lesson, so if you have a Deathmatch game already, you can use it for this course and move on to the next lesson.
Start a New Project
To get started, use the Create menu to make a new project.
Select the Last Man Standing framework in the Gameplay Frameworks option.
Name your project. This will name the local project file, and your final published name can be different.
Click Create.
Explore the Project
The Last Team Standing framework gives you a complete game arena and shooter functionality out of the box, and includes a the rules that players do not respawn until the start of the next round.
Test Shooter Mechanics
Besides player movement, Last Team Standing also gives each player a gun to shoot, and the ability to open and close doors.
Shoot the default gun with the left mouse button.
Open and close a door with F.
Test Multiplayer Gameplay
Core projects also include multiplayer networking by default. Because this is a crucial component of this game, it is important to test using Multiplayer Preview Mode as much as possible.
Click Multiplayer Preview Mode and switch the numbers of players to 2.
Press Play to start the preview. This will open two separate windows.
You can use Alt + Enter to toggle between fullscreen and windowed mode. You can also use Win + Arrow to dock the screens side by side.
Customizing the Game
In this next section, you will see different ways to customize the base game, before we add the more complex elements in later lessons. The changes here are inspired by Valorant, but will give you options of ways your game could be made totally differently.
Change to First Person Camera
The Last Team Standing Framework and even an empty project all start with the Third Person Camera Settings object. This is a useful place to start when creating a scene, abilities, or objects, but not what this type of game looks like. Fortunately, it is very easy to change to a different type of camera.
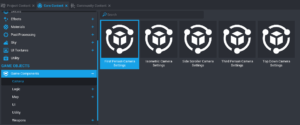
In Core Content, open the Game Components category and then open the Camera section.
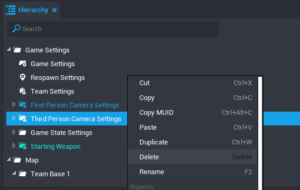
Click and drag the First Person Camera Settings object into the Hierarchy, in the Game Settings folder.
Right-click the Third Person Camera Settings object, also in the Game Settings folder of the project Hierarchy, and select Delete.
Press Play to test the game, now in first person!
Disable Jumping
Jumping is a fun mechanic, but one that is often not part of shooter games. Jumps become an unrealistic way to dodge, and require map designers to spend more time building high barriers and invisible walls. Fortunately for us, this is very easy to disable!
Press Play and test jumping with space to make sure that it is currently enabled, afterwards press Stop.
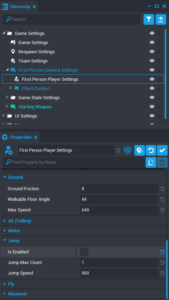
In the First Person Camera Settings object, select the First Person Player Settings object and open the Properties window.
Scroll down to the section called Jump and uncheck the box labeled Is Enabled.
Press Play and try to jump again. If nothing happens, the operation was a success!
Disable Mounting
The horses and hoverboards that come with Core are awesome, but don’t fit every game theme, including this one. Disabling mounts is a little more complicated, and will require a line of code.
Create the Script
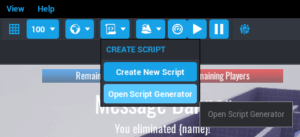
In the top toolbar, click the Create Script button and select Open Script Generator.
Select Event: Player Join/Leave in the top dropdown menu.
Click Create New Script and name the script PlayerJoinLeave
Open the Project Content window and the MyScripts category. You should see your PlayerJoinLeave script there, now.
Click and drag the script into the Hierarchy, in the Game Settings folder.
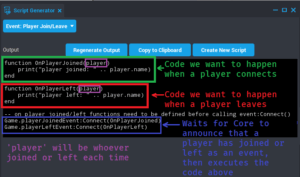
The PlayerJoinLeave Script
This script defines two functions, OnPlayerJoined and OnPlayerLeft
Both functions have an input called player which you can use to get any of the functions and properties associated with the Player type of Core Object.
Both functions print a message about what happened, with the name of the player by using .name to find out what the player’s name is.
The last two lines connect those functions to two events, that belong to the Core Game called playerJoinedEvent and playerLeftEvent.
Core will automatically fire these events whenever a player joins or leaves the game, and the :Connect tells it to also automatically run the function, and give that function the input of the player who joined or left.
Change the Script
Now that you understand how the script works, you can add the code that will change players as soon as they connect.
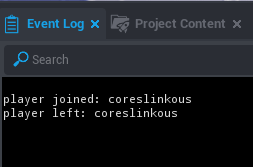
Press Play to test out the script as it is. If it is in the Hierarchy, it should run when the game starts, and print a message when you connect with your name, and another when you stop the preview. You should also test mounting with G to make sure that it is currently enabled.
You can now delete the print() lines from both of the functions.
In the OnPlayerJoin function, add the line: player.canMount = false.
Press Play and try to summon a mount again with G
If nothing happens, it was a success!
Here is what the PlayerJoinLeave script should look like:
In the rest of this course you will learn how to design a new map and integrate it into the game, as well as adding challenges, like a bomb defusal mission, custom abilities and weapons, and even an in-game currency and shop!
Publishing a Game
You now have a completely playable, Last Team Standing game. To test it with real human players, publish your game!
This website uses cookies so that we can provide you with the best user experience possible. Cookie information is stored in your browser and performs functions such as recognising you when you return to our website and helping our team to understand which sections of the website you find most interesting and useful.
Strictly Necessary Cookies
Strictly Necessary Cookie should be enabled at all times so that we can save your preferences for cookie settings.
If you disable this cookie, we will not be able to save your preferences. This means that every time you visit this website you will need to enable or disable cookies again.
3rd Party Cookies
This website uses Google Analytics to collect anonymous information such as the number of visitors to the site, and the most popular pages.
Keeping this cookie enabled helps us to improve our website.
Please enable Strictly Necessary Cookies first so that we can save your preferences!